How to build and use databases to run wf-metagenomics and wf-16s offline

This blogpost has been updated to include the latest features of the wf-metagenomics and wf-16S workflows, as well as the EPI2ME Desktop Application.
Headed for the unknown like Amundsen in the Antarctic? Determined to unveil the vast microbial world hidden in such an isolated landscape? Looking forward to sequencing what mysterious life may dwell in these most extreme niches? You are packing winter gear into suitcases, getting ready for your biggest scientific adventure. But then the realisation hits you… there is no internet at the South Pole!
To decipher the microbial sequencing data generated from an environmental sample, the current approach, roughly speaking, is to compare each read with existing sequences hosted in a database. These reference sequences have been curated and assigned to specific organisms in the past. Naturally, the composition and size of this database can influence the results of the analysis. Therefore, choosing an appropriate database should be the first step to run the workflow offline. But be warned, these databases may require a large amount of disk space, sometimes in excess of 500GB! This is why they are usually stored on servers and access to them requires an internet connection.
Here we explain how to prepare these databases before you set off on an exciting expedition to somewhere the internet does not reach. Or perhaps just a compute cluster node without access to the internet.
But before we delve into database building, let’s recap some background. There are two main modes of running our wf-metagenomics and wf-16s workflows: either with Kraken2 or using minimap2. In both cases you can use one of the default databases or your own custom database (online or offline; for more info see here).
The structure and composition of the databases
In both pipelines, there are two main steps in terms of classifying a sequence taxonomically. In brief, reads are first mapped against a database to find the most similar sequence and then they ‘inherit’ the taxonomy of this matched reference.

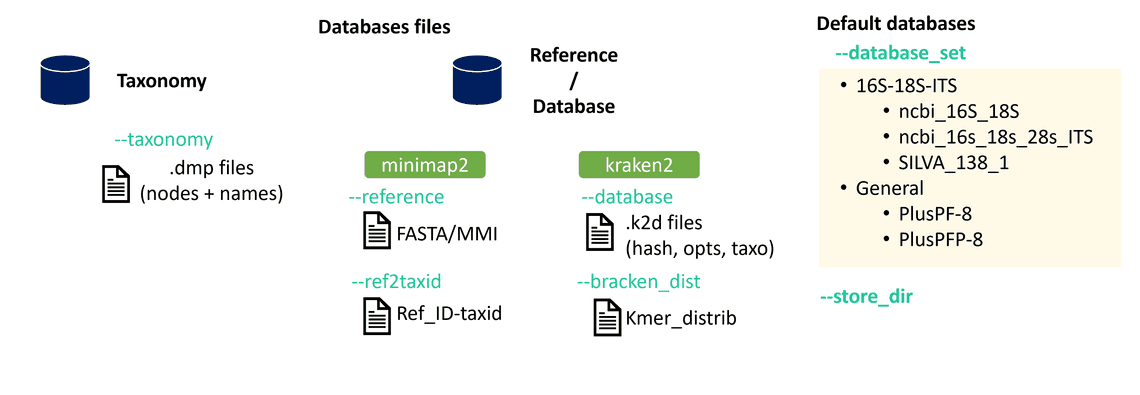
Before explaining how to generate them, let’s have a quick look at the different types of databases the workflows need (Fig. 1).
The taxonomy database contains the organism names and the phylogenetic hierarchy of each taxon. This means, for a given species, it contains the information of its “parent” ranks as well as their taxonomic identifiers (henceforth referred to as “TaxID”). The TaxID is a unique identifier for each taxonomic entry. The NCBI Taxonomy database can be downloaded here and contains different files whose content is described in taxdump_readme.txt. To briefly mention a couple of files within the database:
- the nodes.dmp file represents taxonomy nodes. It includes the TaxID of each node, and also the TaxID of the parent nodes as well as their rank.
- the names.dmp file includes the scientific name of each TaxID.
The workflow accepts as inputs: a folder, a .tar.gz file, or a .zip file.
If you wish to use a taxonomy database different from the one provided by the NCBI Taxonomy, you might want to use taxonkit to create NCBI-style taxdump files for custom taxonomy.
The minimap2 database is a file particular to the minimap2 program (Li, 2018). You can read about minimap2 in one of our previous posts; it is a tool to align reads against a reference. A reference file provided as a FASTA file must first be converted to a minimap index: an MMI file. To create an MMI from a FASTA file you can run the following command:
minimap2 -x map-ont -d reference.mmi reference.fa
To use this index within wf-metagenomics you also need a ref2taxid file. This is a tab-delimited file containing the TaxID for each reference sequence in the reference file. We will discuss how to create this below.
The Kraken2 database is used with the Kraken2 (Wood et al., 2019) program for assigning taxonomic labels. Kraken2 uses a k-mer-based approach which drastically reduces memory usage as well time requirements of the taxonomic classification.
A Kraken 2 database is a directory containing at least 3 files:
hash.k2d: Contains the minimizer to taxon mappings.opts.k2d: Contains information about the options used to build the database.taxo.k2d: Contains taxonomy information used to build the database (the taxonomy database).
Apart from these files, you will also neeed an extra file to run bracken. Bracken (Lu et al., 2017) is a complementary tool to Kraken2 that uses the classifications to estimate the abundances of each organism at a specific taxonomic rank.
The workflow accepts as inputs: a folder and a .tar.gz file.
An essential point when using any of the databases above is that we must have a coherent set of files. Importantly the taxonomy and database reference set must match in their labellings of sequences.
Now that we have covered the relevant background information, I will use the following lines to explain:
- How to store the default databases so that they can be used offline.
- How to obtain pre-built Kraken2 databases.
- How to make your own database from scratch.
- How to build the SILVA database for Kraken2 and minimap2.
Storing a database the easy way
Now, that we know which files are needed to run the workflow, let’s continue with how to prepare these files.
First, a solution without headache. If you wish to use one of the databases provided by wf-metagenomics (‘ncbi_16s_18s’, ‘ncbi_16s_18s_28s_ITS’, ‘SILVA_138_1’, ‘PlusPF-8’, ‘PlusPFP-8’), the easiest option is run the workflow while connected to the internet and store the databases to your device.
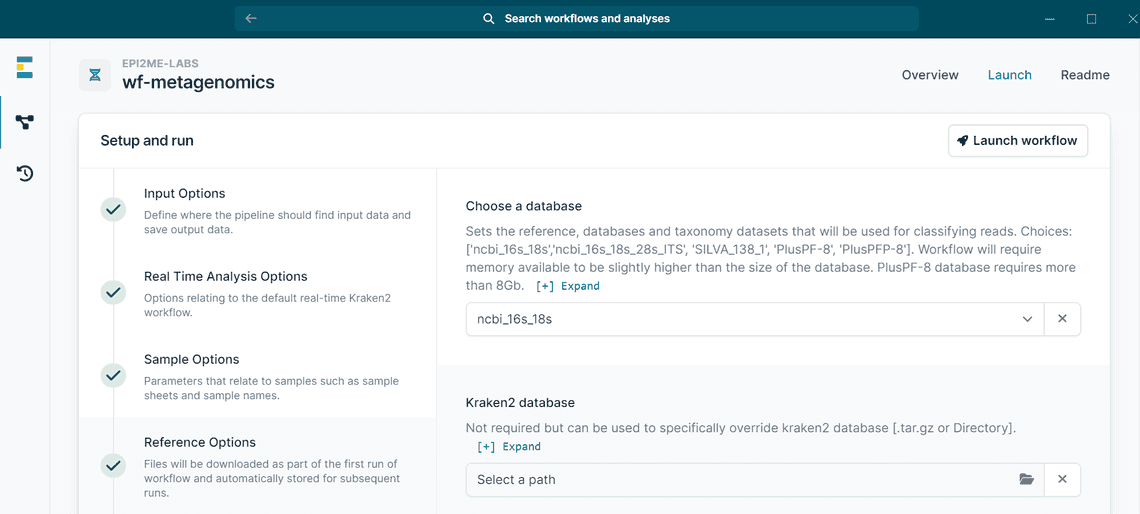
For saving the database to device, use the the --database_set option (“Choose a database” under “Reference Options” in the EPI2ME Desktop application) to specify the database you wish to download and use. You also have to specify a location with --store_dir (“Store directory name” in the application) where a copy of the database will be kept for later use.
If you have cloned the GitHub repository, you can use the toy dataset in test_data to quickly run the workflow and trigger the database download:
nextflow run wf-metagenomics/main.nf --fastq wf-metagenomics/test_data/case01 --database_set ncbi_16s_18s --store_dir favourite_path_to_store_db
Alternatively, in the EPI2ME application you can:
- Go to
Run this workflow > Setup and run > Reference Options. - Choose your favourite database (Figure 2).

Figure 2 - How to choose between default databases in EPI2ME. - Run the workflow for the first time. Databases will be stored and ready to be used the next time you run the workflow.
Standard Kraken2 databases
Kraken2 supports a wide range of prebuilt databases that can be downloaded from here. The selection includes databases of varying sizes and including different organisms. You can inspect the content of the database using the command kraken2-inspect (available with Kraken2). Larger databases contain more sequences and may provide more accurate results. On the other hand, though, they also require more computing resources (if you are worried about compute requirements, you can look into mitigating options like --kraken2_memory_mapping).
To download one of the databases (e.g. PlusPF-8), run:
wget https://genome-idx.s3.amazonaws.com/kraken/k2_pluspf_08gb_20231009.tar.gz
These prebuilt databases also include the corresponding bracken files and are packaged as .tar.gz archives. To uncompress them in Windows, you can right-click on the file and copy the path of the directory (Properties>Location). Then, open Windows Powershell and run the following commands:
# Move to the folder where the file is:cd path/to/directory_with_k2_index# Create a directory to uncompress the filemkdir k2_index# Uncompress the filetar -xzf k2_index.tar.gz -C .\k2_index\
Now, you can run the workflow with the new database (and remember to also provide the taxonomy database):
nextflow run wf-metagenomics/main.nf --database k2_index --taxonomy path_to_taxonomy_database
These prebuilt kraken2 databasee use the NCBI taxonomy described in section above. You can download it with the next command. For other databases, you will need to find out which taxonomy database they use (see below for SILVA database).
wget https://ftp.ncbi.nlm.nih.gov/pub/taxonomy/new_taxdump/new_taxdump.tar.gzmkdir NCBI_taxdumptar -xf new_taxdump.tar.gz -C NCBI_taxdump
Wandering off the beaten track
If you are feeling adventurous, you can also use your own database! You can build custom databases by following the instructions described here for Kraken2 and here for the bracken file. To illustrate how to do it, we will walk through how the included ncbi_16s_18s database resources were created by:
- downloading the taxonomy database (required in both pipelines),
- creating a minimap2 index, and
- creating a Kraken2 database.
The NCBI RefSeq Targeted Loci Project
These databases are specific for targeted loci, which act as specific molecular markers (16S rDNA, 18S rDNA (SSU), 28S rDNA (LSU) gene and internal transcribed spacer (ITS)) that are used for phylogenetic and barcoding analysis. They are described here. You can also find the different projects for Bacteria, Archaea and Fungi at the NCBI RefSeq Targeted Loci FTP site.
The taxonomy database
In this case, we will use the NCBI taxonomy, so we need to download it from here, as it has been described in the Standard Kraken2 databases.
The minimap2 reference files
Here we show how to create a reference file (and its corresponding ref2taxid file) for the minimap2 pipeline. In this case, we build a reference that contains 16S rDNA and 18S rDNA sequences from the NCBI RefSeq Targeted Loci projects, but you can use your favourite sequences to create a FASTA/MMI file and its matching ref2taxid to use as inputs.
The process works as follows:
## 1. Download the targeted loci projects and concatenate the files:wget https://ftp.ncbi.nlm.nih.gov/refseq/TargetedLoci/Archaea/archaea.16SrRNA.fna.gz # Archaea 16Swget https://ftp.ncbi.nlm.nih.gov/refseq/TargetedLoci/Bacteria/bacteria.16SrRNA.fna.gz # Bacteria 16Swget https://ftp.ncbi.nlm.nih.gov/refseq/TargetedLoci/Fungi/fungi.18SrRNA.fna.gz # Fungi 18Scat *rRNA.fna.gz > ncbi16s18srRNA.bacteria_archaea_fungi.fna.gz## 2. Create an MMI index for the minimap2 pipeline (optional)minimap2 -x map-ont -d ncbi16s18srRNA.bacteria_archaea_fungi.mmi ncbi16s18srRNA.bacteria_archaea_fungi.fna
To create the ref2taxid file for NCBI sequences it can be downloaded again from here:
## 3. Download and prepare the ref2taxid TSV filewget https://ftp.ncbi.nih.gov/pub/taxonomy/accession2taxid/nucl_gb.accession2taxid.gz### As this file may contain unneeded entries, we extract only those of the sequences included in the FASTA file.grep -oP '^>[^\s]+' ncbi16s18srRNA.bacteria_archaea_fungi.fna | sed 's/^>//' > accessions.txt### filter the records using grepzcat nucl_gb.accession2taxid.gz | grep -w -f accessions.txt \> hit.acc2taxid.tsv### pick the relevant columns ('accession.version' and 'taxid')cut -f2,3 hit.acc2taxid.tsv > ref2taxid.targloci.tsv
The Kraken2 database files
From these files we can build the corresponding Kraken2 database. When building a custom Kraken2 database you will obtain two main folders during the process: The library and the taxonomy.
The library contains the reference libraries. Some of them are available from the kraken2-build command (see here). Alternatively, we can also use the files generated above (so that we’re using the same database as in the minimap2 workflow).
# prepare header of the FASTA file to contain TaxIDs: kraken:taxid|XXXcut -d$'\t' -f1,2 ref2taxid.targloci.tsv --output-delimiter='|kraken:taxid|' > new_name.txtcut -f1 ref2taxid.targloci.tsv | paste - new_name.txt > alias.txtseqkit replace \-p '^(\S+)(.+?)$' \-r '{kv}' ncbi16s18srRNA.bacteria_archaea_fungi.fna \-k alias.txt ncbi16s18srRNA.bacteria_archaea_fungi.fna \> ncbi16s18srRNA.bacteria_archaea_fungi.rename.fna# build the database using the option `add-to-library` to use your sequenceskraken2-build \--add-to-library ncbi16s18srRNA.bacteria_archaea_fungi.rename.fna \--db kraken2_database/
The taxonomy contains the taxonomy database. This can be the same folder that we have downloaded and uncompressed previously:
mv NCBI_taxdump/ kraken2_database/taxonomy
Alternatively, you can also download the NCBI taxonomy with the next command:
kraken2-build --download-taxonomy --db kraken2_database
With both directories, we are ready to build the Kraken2 database:
# build the databasekraken2-build --build --db kraken2_database
Once the Kraken2 database has been built, you will need to create the bracken additional file using the following command:
bracken-build -d kraken2_database/ -l 1000generate_kmer_distribution.py \-i kraken2_database/database1000mers.kraken \-o database1000mers.kmer_distrib
Run wf-metagenomics or wf-16S using these databases:
After all this we are finally ready to run wf-metagenomics with our custom database!
Using Kraken2:
nextflow run ~/workflows/wf-metagenomics/main.nf \--fastq ~/workflows/wf-metagenomics/test_data/case01/ \--taxonomy NCBI_taxdump/ \--database kraken2_database
Using minimap2:
nextflow run ~/workflows/wf-metagenomics/main.nf \--fastq ~/workflows/wf-metagenomics/test_data/case01/--classifier minimap2 \--taxonomy NCBI_taxdump/ \--reference ncbi16s18srRNA.bacteria_archaea_fungi.fna \--ref2taxid ref2taxid.targloci.tsv
In EPI2ME you can set the path to your databases as shown in Figure 4. The relevant options are in the Reference Options section.

To create the ncbi_16s_18s_28s_ITS database we followed the same procedure, but also added the ITS project and 28S ribosomal RNA projects for Fungi from the Targeted Loci site.
The SILVA database
The SILVA database provides updated datasets of small (16S/18S, SSU) and large subunit (23S/28S, LSU) ribosomal RNA (rRNA) sequences for all three domains of life (Bacteria, Archaea and Eukarya). It does not provide species-level resolution, genus is the lowest taxonomic rank that can be used. You can use this database in wf-metagenomics by setting --database_set to SILVA_138_1.
We have included SILVA as one of the default databases of the workflow and you can save it locally for running offline by following the instructions in the Storing a database the easy way section above. If you want to build the database yourself there are two ways: either using the NCBI TaxIDs or using the IDs provided by the SILVA project itself (the files can be downloaded from here). In the latter case you also need to build a custom taxonomy database using the SILVA TaxIDs.
When we built the SILVA database, we used the method recommended by Kraken2 using SILVA TaxIDs. This process will also download the FASTA file that can be used as reference for the minimap2 subworkflow.
# Build SILVA Kraken2 databasekraken2-build --db SILVA_138_1 --special silva# Create bracken filesbracken-build -d SILVA_138_1 -l 1000generate_kmer_distribution.py \-i SILVA_138_1/database1000mers.kraken \-o database1000mers.kmer_distrib
Now you should be ready to prepare your databases to run the workflow offline!
Summary
In this post we have surveyed a variety of methods for obtaining and storing metagenomic databases. Once obtained the databases can be used (and reused) in an offline setting.
The post is not intended as a comprehensive user guide to the various programs used. Please see their respective documentation and command-line instructions for additional information. We hope this information proves useful to the community.
List of dependencies:
These commands have been used in a linux environment except where otherwise indicated.
Natalia Garcia
Bioinformatician
Table Of Contents
Related Posts
Information
